Add-on intents
- Explanation
- 7-min read
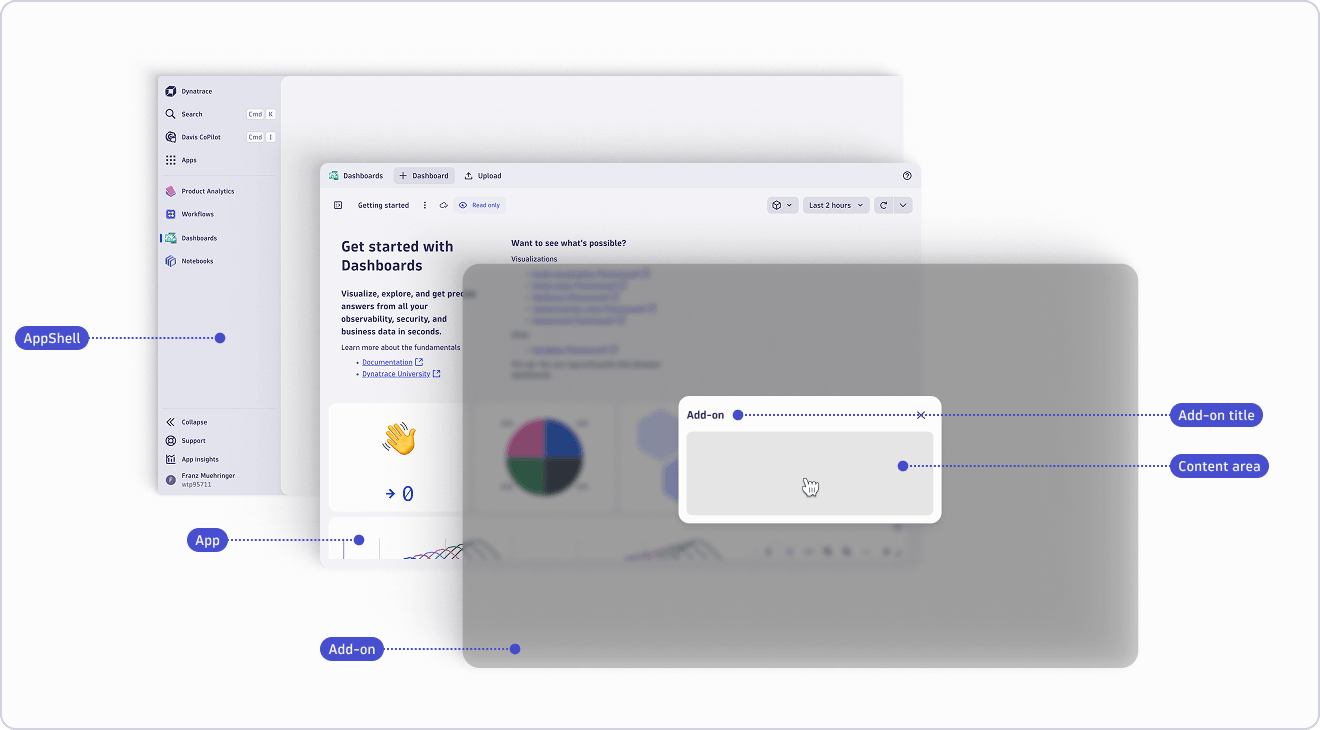
Add-ons allow users to complete quick actions without switching apps. An add-on is a lightweight app component that responds to an intent—a request from another app to perform a specific task—and renders the target app in an overlay on top of the current app, rather than navigating away. The user stays in their current context, borrows functionality from the add-on, and returns to where they were when they close it. Add-ons can also return a value to the app that sent the intent.
Examples include:
- Pick a Slack channel
- Refine a Dynatrace Pattern Language (DPL) pattern
- Replay a user session
From a code perspective, add-ons and regular intents use the same declaration format. The difference is the addonMode property in the intent configuration: setting it to "overlay" tells the AppShell to load the target app in an overlay instead of navigating to it.
When to build an add-on vs. a Design System component
This distinction matters when teams are deciding how to deliver shared functionality across apps.
| Design System component | Add-on | |
|---|---|---|
| Purpose | Building blocks for app developers to compose their own UI | A complete, self-contained experience that works identically everywhere |
| Flexibility | App developer shapes the component to their use case | The add-on controls the entire experience. The consuming app cannot customize it. |
| Knowledge | Generic, composable | Expert knowledge baked in (for example, Session Replay knows exactly how to render a replay) |
| Who builds it | Strato / Design System team | The specialist team that owns the domain (Platform UI, A&MS, DEM, etc.) |
| When to use | You need building blocks to construct something specific to your app | You need a pre-built solution that should work identically in every app that uses it |
If the functionality requires deep domain expertise and should look the same everywhere, build an add-on. If app developers need to adapt the UI to their specific context, build a DS component.
-
Good add-on candidates:
- Session Replay—replay playback is complex, domain-specific, and should work identically whether opened from Infrastructure, Application Monitoring, or a custom app.
- Alert creation—creating an anomaly detector from a DQL query requires Alerting domain knowledge.
- Segment management—segment selection and creation is a cross-cutting concern with its own UX patterns.
-
Better as Strato Design System components:
- A date picker, a chart renderer, a data table—these are generic building blocks that each app should be able to style and configure for its own needs.
Add-on-specific intent properties
For general intent properties, see the Receive intents guide.
| Property | Type | Required | Description |
|---|---|---|---|
addonMode | "overlay" | Optional for regular intents. Required to make the intent an add-on. | "overlay" renders the target app in an overlay on top of the source app. |
addonConfig | object | Optional. Only valid when addonMode is "overlay". | Visual configuration for the overlay. See sub-fields below. |
addonConfig.size | "small"| "medium"| "large" | "maximized" | Optional. Defaults to { width:"medium", height: "auto" } | Controls the overlay size. Recommended preset size. To set custom size, see the Custom sizing section below. |
addonConfig.title | string | Optional. Defaults to the add-on app's name. Cannot be combined with addonConfig.headless: true. | Label shown in the overlay header. |
addonConfig.headless | boolean | Optional. Defaults to false. Cannot be combined with addonConfig.title. | When true, the overlay renders without a title bar. |
responseProperties | object | Optional in general. Required for intents-with-response (the add-on hands a value back via resolveAddonWithResponse()). | Schema for data the add-on returns to the source app. Same shape as properties. |
We recommend using the preset sizes ("small", "medium", "large", "maximized") for addonConfig.size.
However, if you need more control, you can use the detailed object form to mix preset widths with flexible heights - including a pixel value for exact dimensions or "auto" to let the overlay adapt to its content:
{
  "addonConfig": {
    "size": {
      "width": "small" | "medium" | "large",
      "height": "small" | "medium" | "large" | "auto" | number
    }
  }
}
Example combining the fields:
{
  "intents": {
    "pick-dashboard": {
      "description": "Select existing dashboard or create a new one",
      "addonMode": "overlay",
      "properties": {},
      "responseProperties": {
        "dt.document.id": {
          "required": true,
          "schema": { "type": "string" }
        }
      }
    }
  }
}
Add-on UX guidelines
Icons and visual treatment
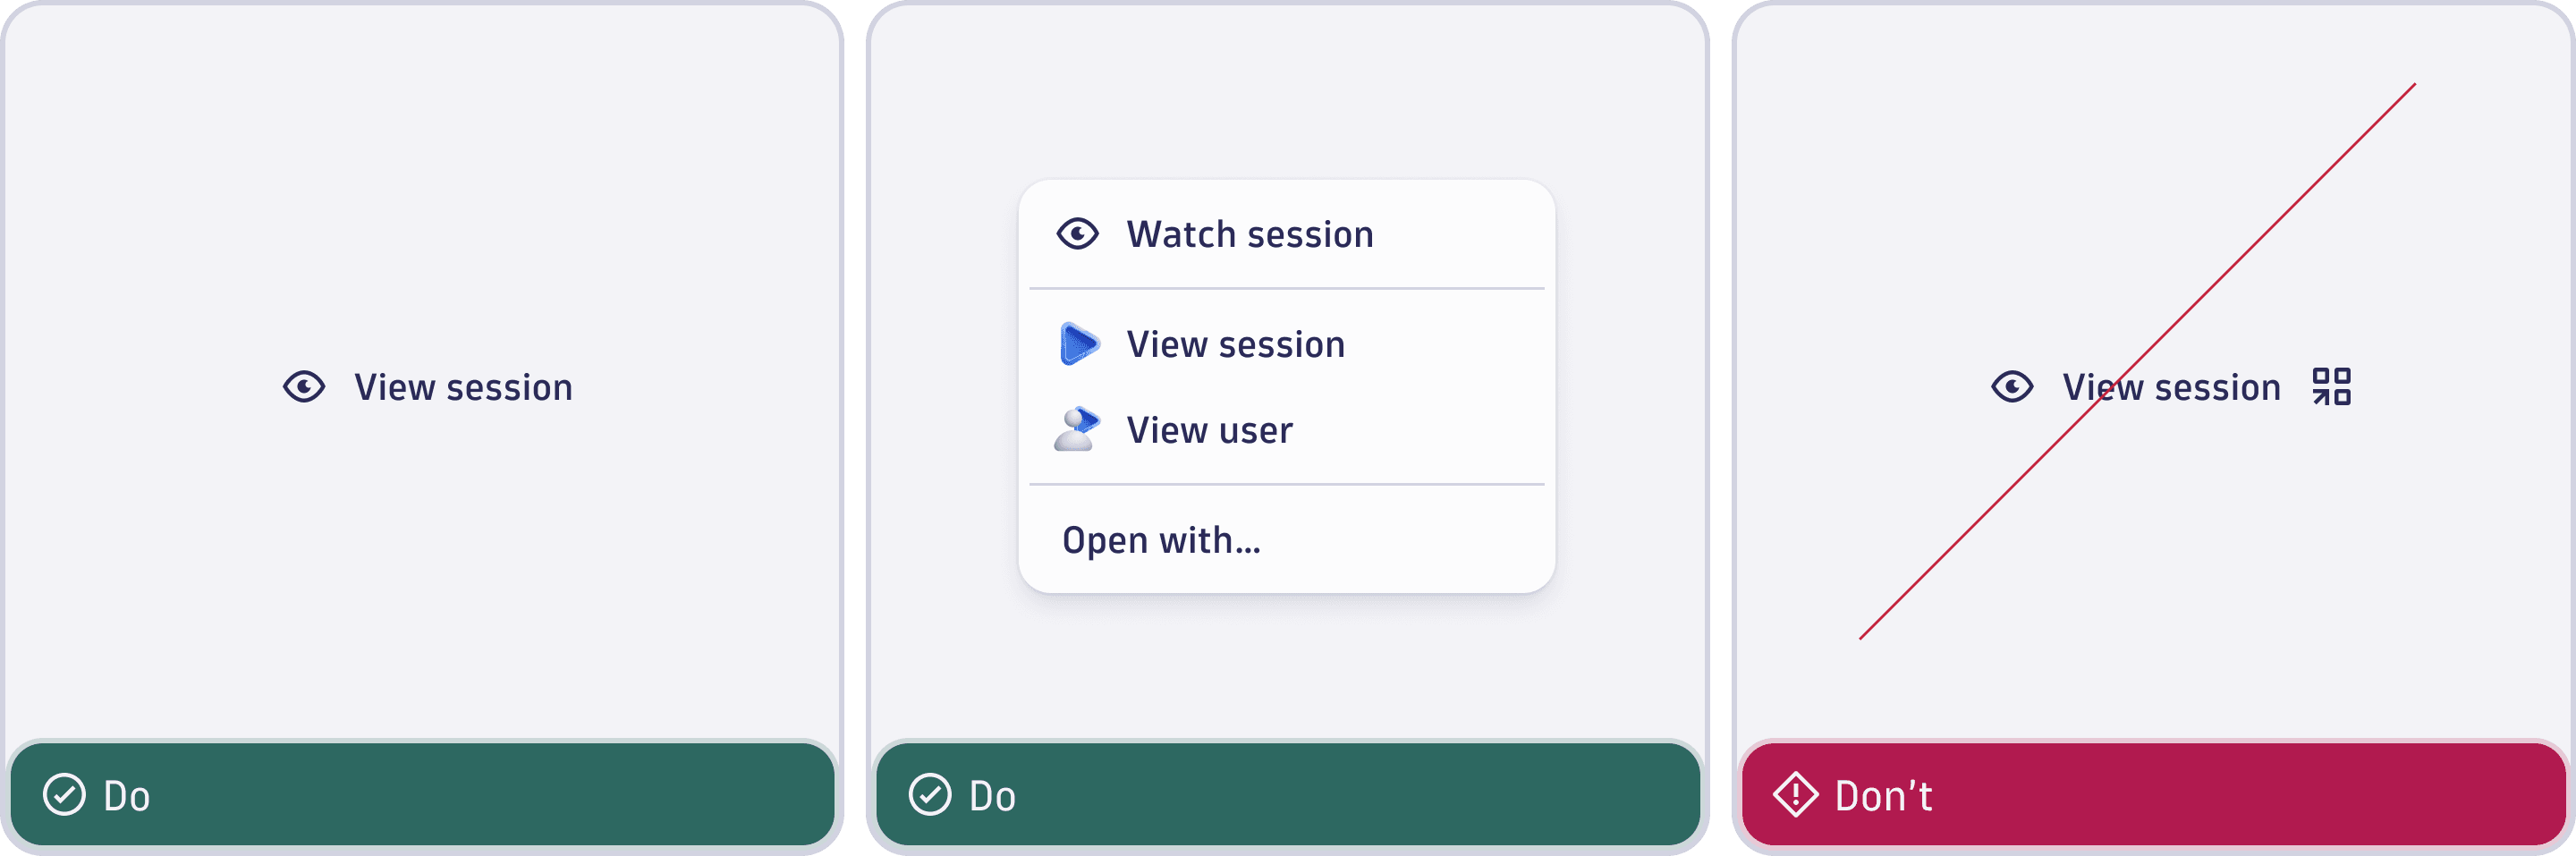
Add-ons should blend into the parent app's UI. There is no requirement that add-ons use a specific icon, layout, or visual treatment to mark themselves as add-ons. Treat the add-on like any other in-context action and let it inherit the surrounding app's visual language.
For menu entries, a functional icon (rather than an app icon) is a useful signal that the action stays in context, but it is not mandatory. Choose what reads best for the user.
Placement in IntentButton
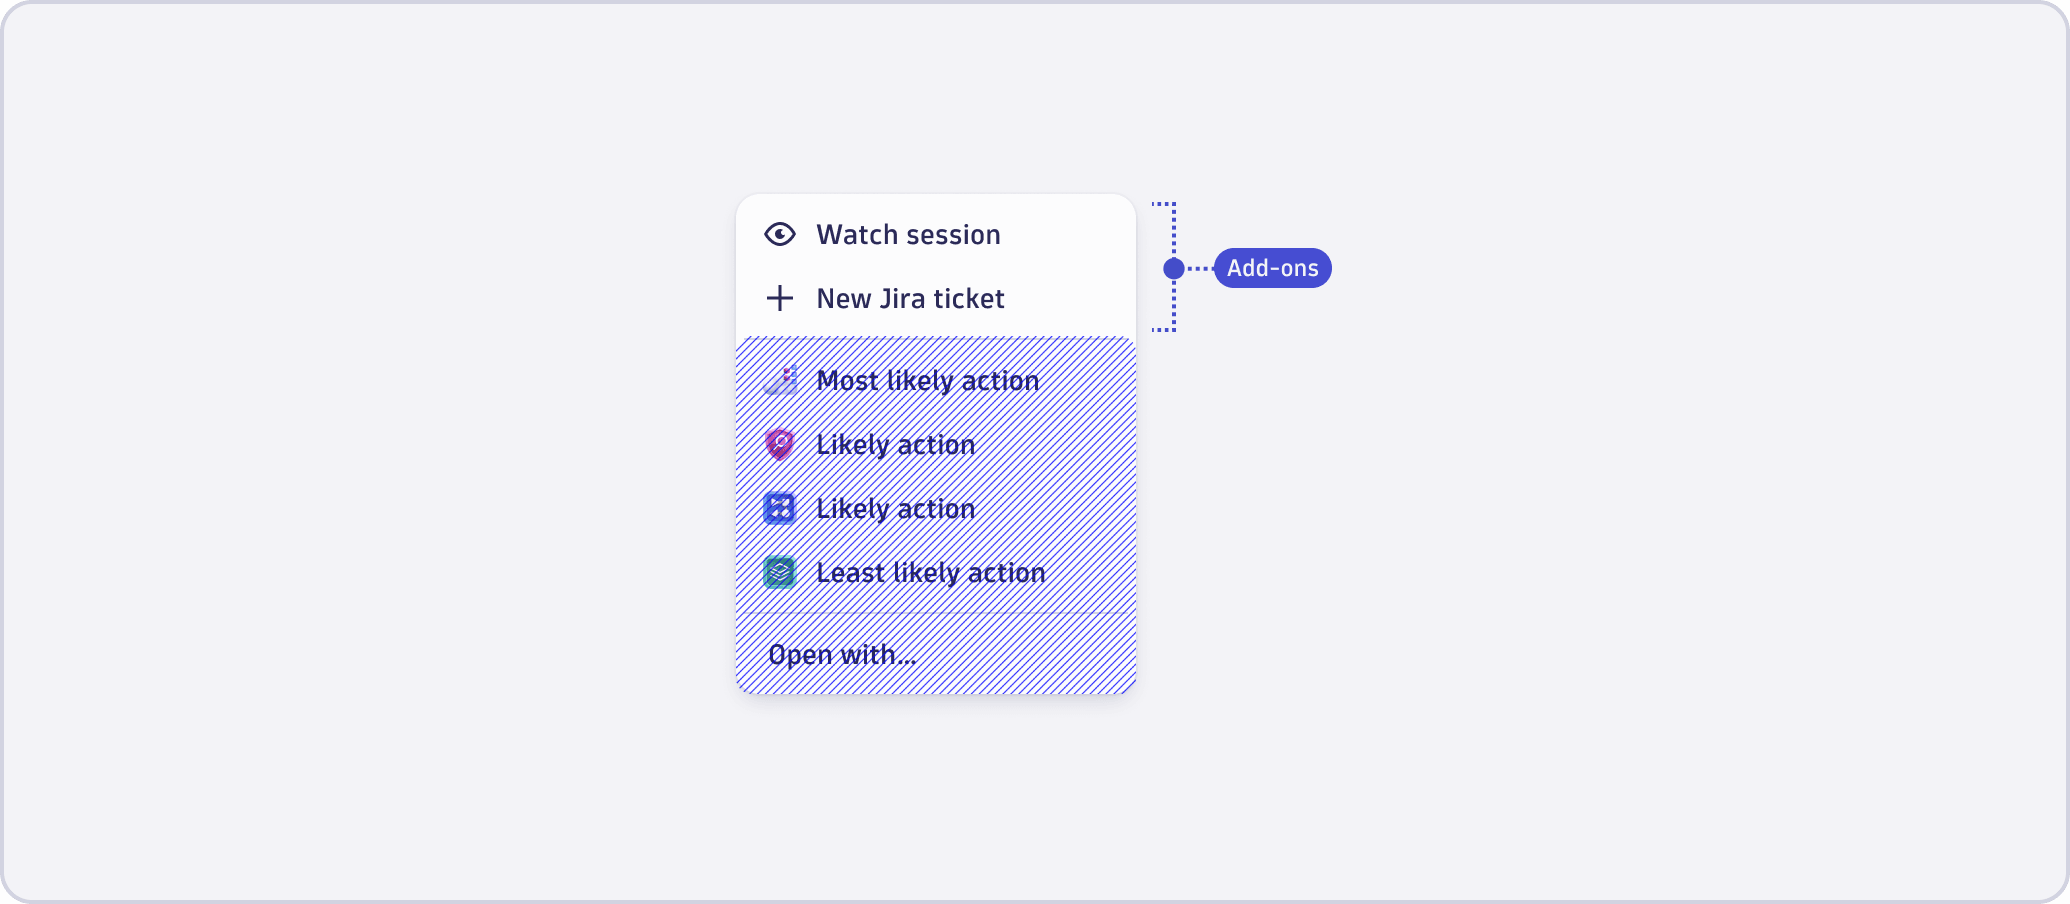
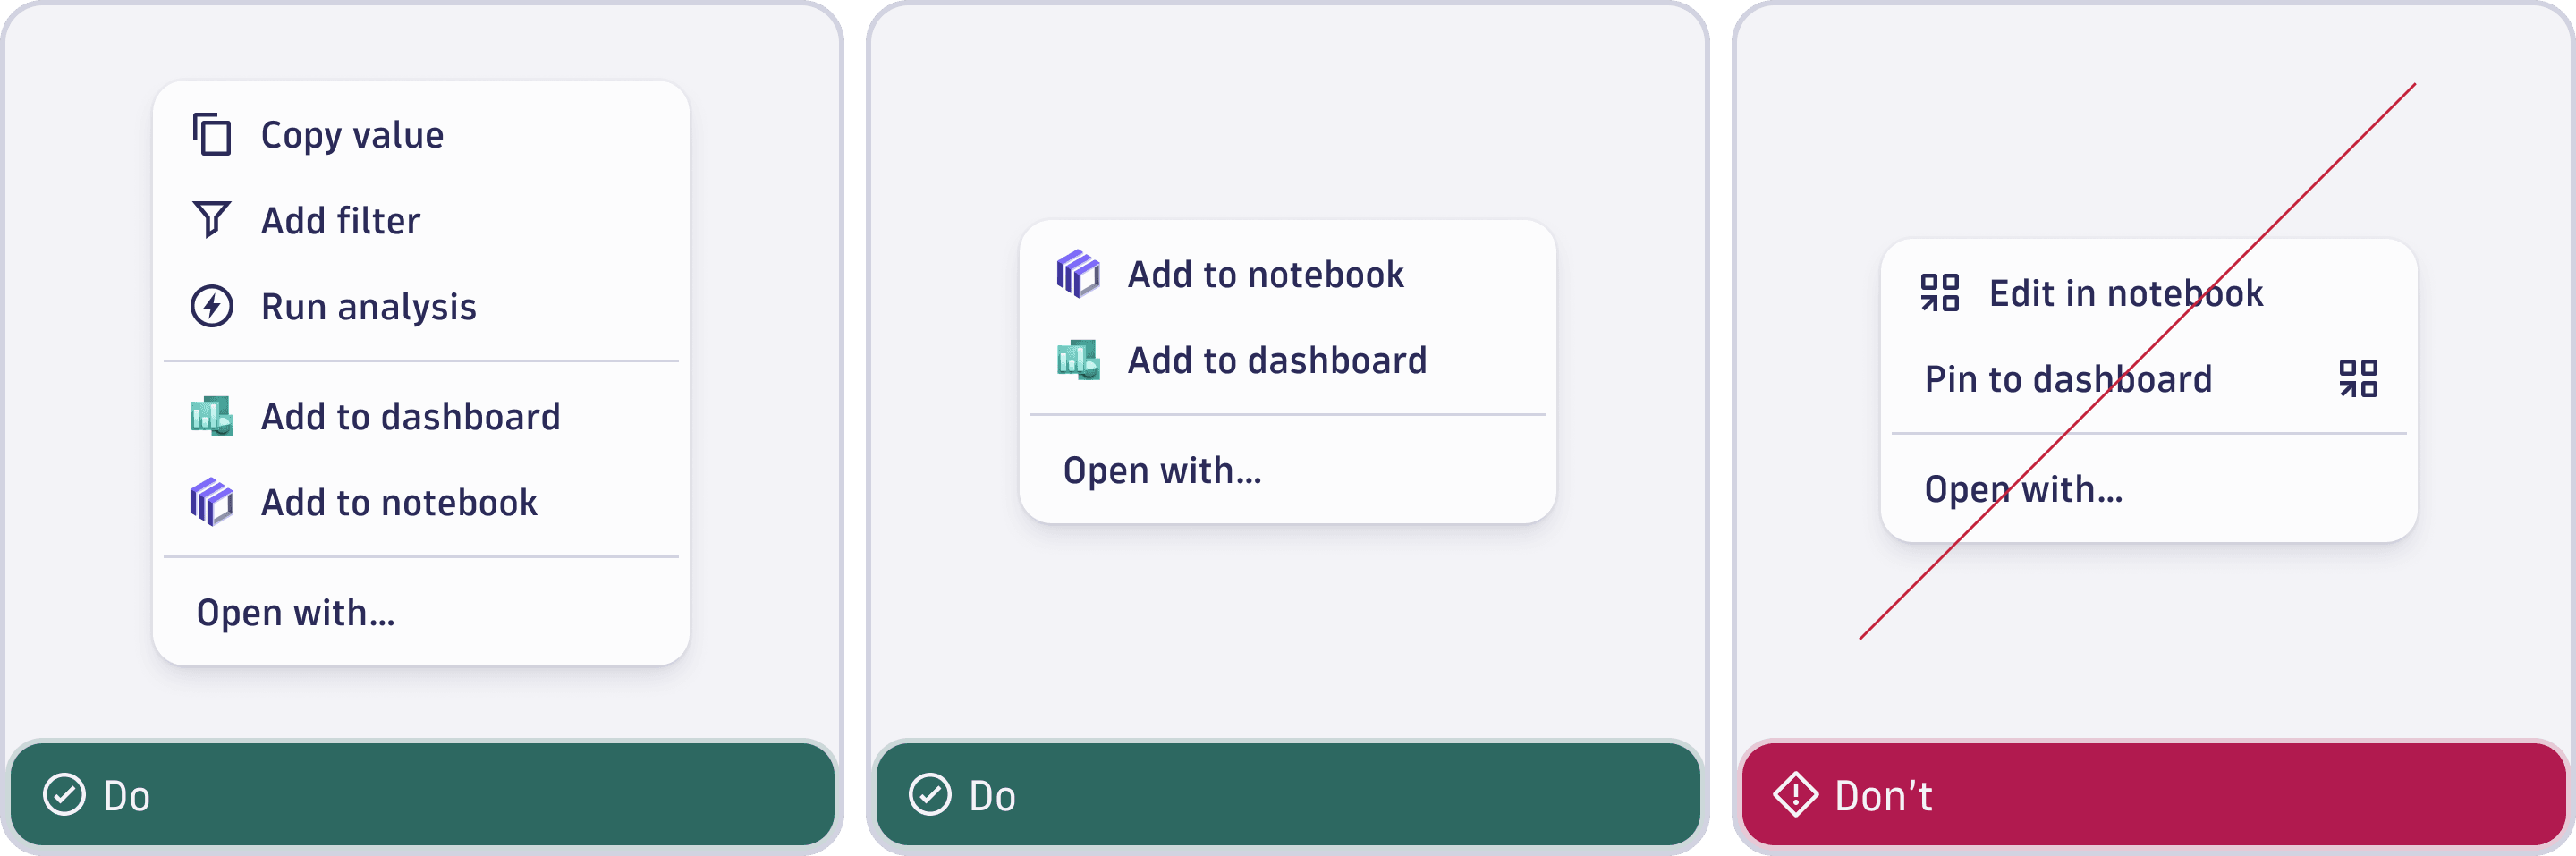
In the IntentButton three-dot menu, add-ons can appear before or after additional explicit intents, but always before the Open with... fallback. This keeps in-context actions (add-ons) grouped near navigation actions (explicit intents), with the discovery fallback always last.
Constraints
Modal stacking
Application add-ons should not open other application add-ons. Currently, if an add-on triggers another add-on intent, the calling add-on closes and the new one opens, which means the user loses their original context. This is a known limitation.
Proper stacking for platform-level system primitives (the intent picker, file upload, permission prompts) is in development. Once shipped, these platform primitives will stay on top of an existing add-on without closing it.
Maximum depth: 2 levels (base context + one platform primitive on top). A third level is permitted only if a platform primitive triggers another platform primitive (for example, upload picker opens a permission prompt).
Add-ons share the same security context and context sharing model as all other intents.
Implementation
Send an add-on intent example
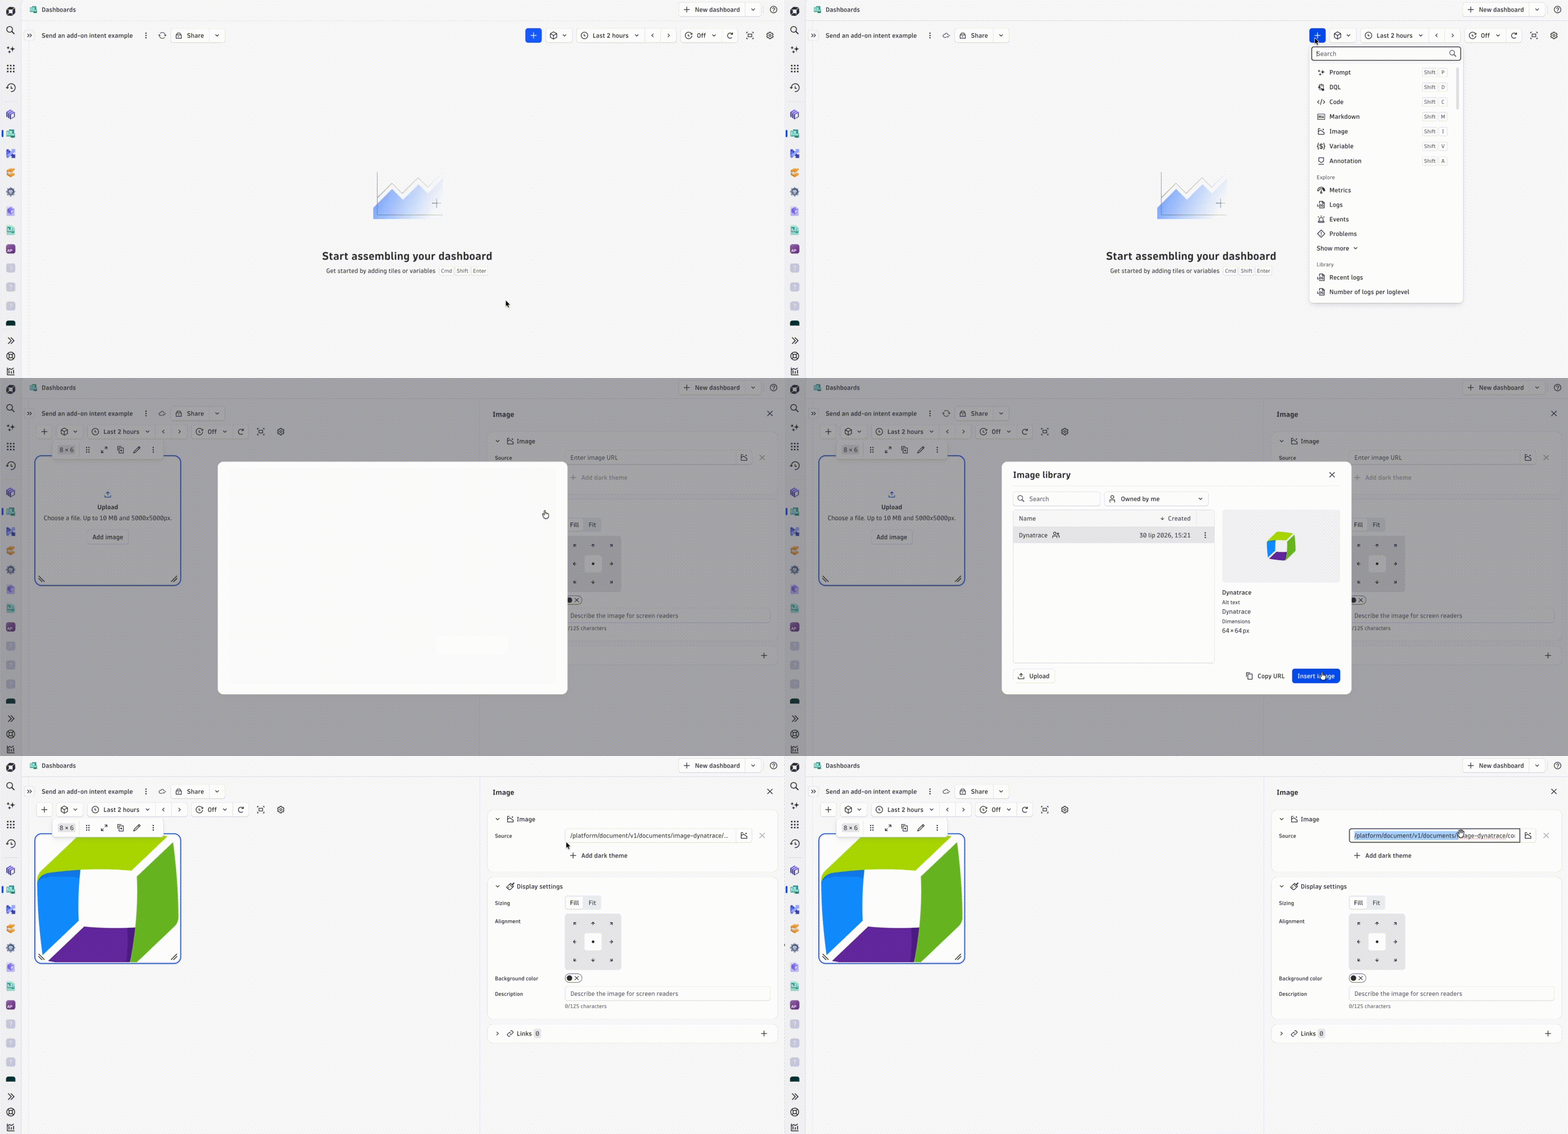
Once the upload modal closes, the add-on returns the selected image path as the intent response to the source app.
Receive add-on intents in apps
You can receive add-on intents in apps. Learn more about receiving an intent in the Receive intents guide.
App developers can specify which intents their apps can handle in the add-on mode by setting the addonMode property in the intent declaration in the app manifest. Also, if an intent returns a value, this value needs to be declared as a responseProperties object.
Add-on vs regular intents
If an intent returns a value, you need to declare it as add-on intent. In all other cases, you can go with this rule of thumb: If an action initialized with an intent is short-lived and has a well-defined start and end, you can implement it as an add-on intent.
Manifest declaration
{
  "environmentUrl": "<Your-Environment-URL>",
  "app": {
    "id": "<Your-App-ID>",
    "name": "<Your-App-Name>",
    "description": "<Your-App-Description>",
    "version": "0.0.0",
    "scopes": [],
    "intents": {
      "add-query-to-dashboard": {
        "addonMode": "overlay",
        "description": "Add a query to a dashboard",
        "properties": {
          "dt.query": {
            "required": true,
            "schema": {
              "type": "string"
            }
          }
        }
      },
      "pick-dashboard": {
        "addonMode": "overlay",
        "description": "Select existing dashboard or create a new one",
        "properties": {},
        "responseProperties": {
          "dt.document.id": {
            "required": true,
            "schema": {
              "type": "string"
            }
          }
        }
      }
    }
  }
}
App routing and splitting
App routing
An app receives add-on intents like regular intents. Learn more in Intent app routes.
// `Handling the add-on intent outside the main app UI`
import React from 'react';
import { Route, Routes } from 'react-router-dom';
import { PageLayout } from '@dynatrace/strato-components/layouts';

export const App = () => {
  return (
    <Routes>
      <Route path="/intent/add-query-to-dashboard" element={<HandleAddQueryToDashboardIntent />} />
      <Route path="*" element={<MainApp />} />
    </Routes>
  );
};

const MainApp = () => {
  return (
    <PageLayout>
      <PageLayout.Header />
      <PageLayout.Content>
        <Routes>
          <Route path="/" element={'Home'} />
          <Route path="/intent/:intentId" element={<HandleIntent />} />
        </Routes>
      </PageLayout.Content>
    </PageLayout>
  );
};

const HandleAddQueryToDashboardIntent = () => {
  // handles the `add-query-to-dashboard` add-on intent outside the main app UI
  return null;
};

const HandleIntent = () => {
  // handles any other intent within the main app UI
  return null;
};
App route code splitting (optional)
You can split the app route code if you need to optimise the app bundle's size. Otherwise, this step isn't necessary.
If you use this option, you need to set up a plugin for esbuild. However, our code-splitting support is currently experimental.
import React, { lazy, Suspense } from 'react';
import { Route, Routes } from 'react-router-dom';

const LazyHandlePickDashboardIntent = lazy(() =>
  import('./HandlePickDashboardIntent').then((m) => ({ default: m.HandlePickDashboardIntent })),
);
const LazyMainApp = lazy(() => import('./MainApp').then((m) => ({ default: m.MainApp })));

export const App = () => {
  return (
    <Routes>
      <Route
        path="/intent/pick-dashboard"
        element={
          <Suspense fallback={'Loading...'}>
            <LazyHandlePickDashboardIntent />
          </Suspense>
        }
      />
      <Route
        path="*"
        element={
          <Suspense fallback={'Loading...'}>
            <LazyMainApp />
          </Suspense>
        }
      />
    </Routes>
  );
};
Add-on intent lifecycle
With the methods from the @dynatrace-sdk/addons package, you can control the add-on lifecycle:
resolveAddon(): Closes the add-on modal and returns control to the source app that sent the intent.resolveAddonWithResponse(response: Record<string, any>): Closes the add-on modal and passes the response object back to the app that has sent the intent-with-response.resolveAddonWithNavigation(path: string): Closes the add-on modal and navigates from the app that sent the intent to the add-on app as the main app at the given path.rejectAddon(): closes the add-on modal and rejects the response promise of the app that has sent the intent-with-response.
import React from 'react';
import { rejectAddon, resolveAddon, resolveAddonWithNavigation, resolveAddonWithResponse } from '@dynatrace-sdk/addons';
import { Button } from '@dynatrace/strato-components/buttons';

export const App = () => {
  return (
    <>
      <Button onClick={rejectAddon}>Cancel</Button>
      <Button
        onClick={() => {
          // call a function responsible for adding a query to the dashboard here
          resolveAddon();
        }}
      >
        Add query to dashboard
      </Button>
      <Button onClick={() => resolveAddonWithResponse({ 'dt.document.id': 'my-dashboard-id' })}>Pick dashboard</Button>
      <Button onClick={() => resolveAddonWithNavigation('/dashboards')}>
        View all dashboards in the dashboards app
      </Button>
    </>
  );
};
Conditional UI
You may want to hide some parts of the app UI that are unrelated to the add-on functionality.
You can use the getMode SDK method to check if the app has started in add-on mode. Based on this, you can then choose not to render unnecessary UI elements.
import React from 'react';
import { getMode, rejectAddon, resolveAddonWithResponse } from '@dynatrace-sdk/addons';
import { Button } from '@dynatrace/strato-components/buttons';

export const App = () => {
  return (
    <>
      {getMode() === 'overlay' ? (
        <>
          <Button onClick={rejectAddon}>Cancel</Button>
          <Button onClick={() => resolveAddonWithResponse({ 'dt.document.id': 'my-dashboard-id' })}>
            Pick dashboard
          </Button>
        </>
      ) : null}
    </>
  );
};
Send add-on intents
You can send add-on intent in apps. Learn more about how to send an intent in the Send intents guide.
When sending an intent, the source app can't control the visual mode of the app receiving the intent. However, the target app can opt in to the add-on using the intent's declaration in the app manifest.
import { sendIntent, IntentPayload } from '@dynatrace-sdk/navigation';

const intent: IntentPayload = { 'dt.userSessionId': 123 };
sendIntent(intent);
Depending on the user's choice in the Open with... dialog, the add-on will handle the intent above by navigating from the source app to the target app or showing the target add-on in a modal.
Intents-with-response
When sending an intent-with-response, the source app can request which properties will be returned by the app receiving the intent. The source app requests the expected intent response as a list of property names.
An add-on is required to handle an intent-with-response.
import { sendIntentWithResponse, IntentPayload } from '@dynatrace-sdk/navigation';

const result = await sendIntentWithResponse(
  { 'dt.dpl.pattern': dplPatternToRefine },
  { responseProperties: ['dt.dpl.pattern'] },
);

if (result === undefined) {
  return;
}

if (result.ok === true) {
  // Responses come from another app across a trust boundary, so the SDK types
  // each value as `unknown`. Narrow at runtime before using it.
  const pattern = result.data['dt.dpl.pattern'];
  if (typeof pattern === 'string') {
    // use `pattern`
  }
} else if (result.error.reason === 'Rejected') {
  // The responding app explicitly refused to fulfill the intent.
  // `payload` is an app-defined explanation; its shape is a contract between
  // the calling app and the responding app.
  const rejectionPayload = result.error.payload;
  // use `rejectionPayload`
} else if (result.error.reason === 'Canceled') {
  // The user dismissed the picker/response UI before any app handled the intent.
}
To use await in React components, you need to wrap the asynchronous invocation in an async function. Read more about it in this guide.
The intent payload can be empty when sending an intent-with-response.
import { sendIntentWithResponse } from '@dynatrace-sdk/navigation';

const result = await sendIntentWithResponse({}, { responseProperties: ['dt.slackChannelId'] });
if (result?.ok) {
  const slackChannelId = result.data['dt.slackChannelId'];
}
To use await in React components, you need to wrap the asynchronous invocation in an async function. Read more about it in this guide.
Explicit intent-with-response
When you know exactly which app and intent should handle the response, pass recommendedAppId and recommendedIntentId in the options object. This skips the Open with... dialog and routes directly to the specified app.
import { sendIntentWithResponse, IntentPayload } from '@dynatrace-sdk/navigation';

const intent: IntentPayload = { 'dt.dpl.pattern': dplPatternToRefine };
const result = await sendIntentWithResponse(intent, {
  responseProperties: ['dt.dpl.pattern'],
  recommendedAppId: 'my.dpl-refiner.app',
  recommendedIntentId: 'refine-dpl-pattern',
});
if (result?.ok) {
  const refinedDplPattern = result.data['dt.dpl.pattern'];
}
To use await in React components, you need to wrap the asynchronous invocation in an async function. Read more about it in this guide.