Create a custom Workflow action
- How-to guide
- 6-min read
You can extend Workflows via custom actions. In a custom action, you implement your integration with any third-party system that allows the user to communicate with other systems. Users can then add your custom action as a task to their workflows. This guide explains how to create a custom action.
In this guide, you'll create a custom action named greeter that:
- Accepts a name and a connection as an input.
- Returns a greeting message using the name given as the input and logs the message in Workflows.
- Shows how to retrieve the connection as an app settings object by its ID.
Create an action
A custom action is part of a Dynatrace app. To create an action, run the following command in the root directory of your app within the terminal:
npx dt-app action create greeter
The command will generate an action named greeter in the /actions directory with some default files and register the action in the app config. When you run dt-app deploy, it will detect the action on the filesystem and deploy it as part of the whole app artifact, regardless of whether the action is registered in the app config.
If you develop an app that only consists of actions and doesn't provide a UI, consider hiding your app in the launcher by setting
app.hiddentotruein yourapp.config.json.
Update Jest config
The earlier command also generates Jest files to test your action. If you use Jest for testing your Dynatrace app, you can update your jest.config.js file in the root directory as follows:
module.exports = {
  projects: ['<rootDir>/actions/jest.action.config.js', '<rootDir>/actions/jest.widget.config.js'],
};
Run the action in a workflow
Now that you have updated the app configuration and have all the files, you can deploy the app to run it in a workflow using the following command in the terminal:
npx dt-app deploy
After deployment, do the following:
- Open Workflows and create a new workflow.
- Then, add a task and select the Greeter task from the list.
- Save the workflow and run it.
By running a workflow, you'll end up in the execution monitor. Within there, you can see not only execution details but also the input sent to your action and the result produced by your action. This information is in the respective Detail, Input, and Result tabs. You can find the logs in the dedicated log section at the bottom of the page.
To find the details about building and monitoring workflows, visit Introduction to workflows
| Input Tab | Result Tab |
|---|---|
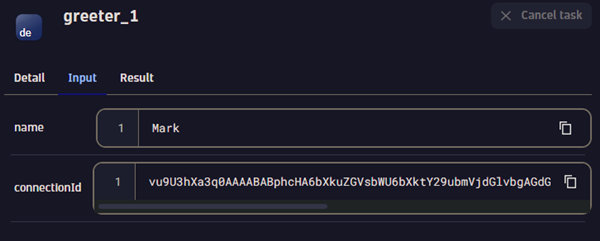 | 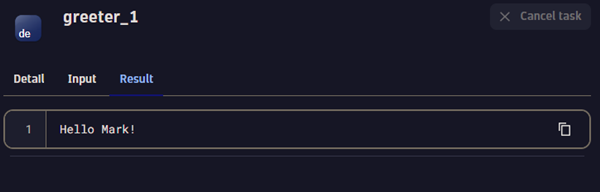 |
Congratulations. You ran a task successfully with your custom action.
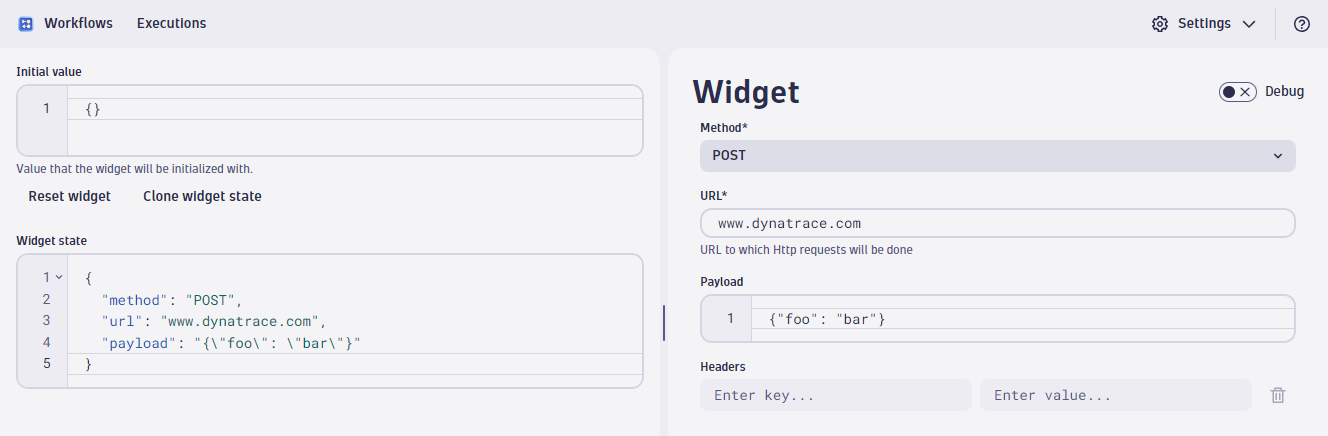
Widget interface
The App Toolkit generates a default widget interface for you after you execute the npx dt-app action create command. For the greeter action, you'll find this default widget UI in /actions/greeter.widget.tsx. It has two UI elements:
- Connection: It's an
AutomationConnectionPickercomponent that lets you pick an app setting. The user defines this app setting, which contains information to connect to an external system. It's then sent to the action logic as theconnectionIdproperty. - Name: It's an input element where the user can insert their name. It's also sent to the action logic as a
nameproperty.
The input produced by the widget is the payload for the action app function. The app function implementing the action defines its contract by the input it consumes. Changing it has an impact on any existing workflow. You need to ensure that your action app function does support legacy and newer payloads if you make changes. The same is true for your action's return value (the return value of the action app function).
This code will result in the following widget UI:

While developing locally, you can mock the connection picker value (My Connection). Go to local development section for app settings to learn more.
Action logic
The App Toolkit generates a default action logic in the /actions directory. This default code handles the connectionId and the name payload sent by the widget interface. You can find the file at /actions.greeter.actions.ts. This file is an app function explicitly for the greeter action.
It's essential to understand the following things:
- The input from the widget interface is available as the
payloadproperty. - The app function's return value becomes the output of the action.
Get app settings
If you look at the code in the file, you'll find that you can get the app settings using getAppSettingsObjectByObjectId from @dynatrace-sdk/client-app-settings-v2 as follows:
const connectionObject = await appSettingsObjectsClient.getAppSettingsObjectByObjectId({
  objectId: payload.connectionId,
});
To use await in React components, you need to wrap the asynchronous invocation in an async function. Read more about it in this guide.
It'll give you access to the URL and the token required to access the external system through connectionObject.value.url and connectionObject.value.token, respectively. You can use them to access the external system in your app function.
The generate action command automatically includes the settings:objects:read scope in your app config, which is essential for operating the getAppSettingsObjectByObjectId function. There's no need for manual scope addition, as the command ensures your app has correct permissions for accessing settings objects.
It's essential to understand that there are different types of fields in settings. Especially for any credentials like token, the "type": "secret" should be used.
Log messages
You can log messages for the end user using the userLogger function exported by @dynatrace-sdk/automation-action-utils as follows:
userLogger.info(`Hello ${payload.name}! Have a great day!`);
These logs will appear in the task's logs in the Workflow for every execution.
The log size is limited to 1 MB.
Debug the action
Workflows offer a dev-helper tool that helps you debug action widgets.
You can access the dev helper via the links displayed by the dt-app on your terminal after executing the npx dt-app dev command.
The total size of a custom workflow action's result and log data must not exceed 6 MB. A larger response will cause the action to fail.
Show sample results
You can show a sample result for your action. Users can look at this sample and figure out what the action output would look like.
The App Toolkit creates a greeter.sample-result.json file in the /assets directory for our greeter action. Open this file and add the sample JSON result.
End an action early
If you want to exit from your action at any point, you can use the UnsuccessfulActionError error class from @dynatrace-sdk/automation-action-utils/actions as follows:
throw new UnsuccessfulActionError('A message why the action failed');
This will result in the action's failure with the given message.
Validate expression values
For actions with an input that's some sort of syntax for a third party system (for example, a Kubernetes manifest, an SQL query, or similar), you want to protect your action from injection attacks. You can, therefore, control the values against which to evaluate an expression. To prevent any unwanted input, specify an expressionValidation in your action manifest to validate the expression value against a pattern.
For example, the app evaluates any expression in the name field against uppercase letters.
// Excerpt of app.config.json
{
  ...
  "actions": [
    {
      "name": "greeter",
      "title": "Greeter",
      "expressionValidation": {"name": {"pattern": "[A-Z]+"}}
   }
  ]
}
A violation such a validation at runtime shall fail the task.
Summary
You learned how to create a custom action with the action widget UI and action function to implement its functionality. For further information about the Workflows and AutomationEngine, have a look at the user documentation.